How To Protect Interior When Cleaning Headliner: Safe Tips
For drivers in the United States, the safest way to clean a car headliner is to use as little liquid as possible. Protect the seats, dashboard, doors, glass, and electronics before you begin. Spray cleaner onto a towel or soft brush—not directly onto the ceiling—and work in small areas.
A vehicle headliner is often made from fabric bonded to a thin foam layer and a rigid backing board. Too much water, heat, or pressure can loosen the adhesive. That can cause sagging, water marks, wrinkles, or permanent damage.

Why Headliner Protection Matters
Protecting the interior prevents cleaner, dirty water, and loose soil from spreading to other surfaces. It also reduces the risk of damage to the headliner itself.
Many modern vehicles have wiring, microphones, lights, sunroof parts, and side-curtain airbag components near the roof. These parts may sit behind or beside the headliner. Excess liquid can reach areas that are hard to dry.
The main risks are:
- Adhesive failure: Too much moisture can weaken the bond between the fabric and foam.
- Water rings: Dirty liquid may dry into visible circles or dark edges.
- Fabric transfer: Hard scrubbing can flatten or change the texture of the cloth.
- Foam damage: Strong solvents may break down the foam backing.
- Electrical problems: Liquid near lights, switches, microphones, or wiring may cause faults.
- Airbag interference: Pulling, cutting, or removing roof trim can affect side-curtain airbag areas.
A headliner is not like a floor mat. It cannot be removed and soaked in a bucket. Treat it more like a thin, delicate wall covering.

What You Need Before Cleaning
Gather the right materials before opening a bottle of cleaner. A simple setup is safer than a large group of harsh chemicals.
Recommended supplies
- Two or three clean microfiber towels
- A soft interior detailing brush
- A small spray bottle
- A mild, fabric-safe automotive cleaner
- Plain water for light dampening
- A soft, dry towel
- A vacuum with a soft brush attachment
- Painter’s tape
- Plastic sheeting or a clean drop cloth
- Nitrile gloves
- A small fan, if available
Choose a cleaner labeled for automotive fabric or interior surfaces. Avoid products that contain bleach, ammonia, strong solvents, acetone, or heavy degreasers.
Do not use a stiff carpet brush. Do not use a steam cleaner unless the vehicle maker or equipment maker specifically approves it for headliners. High heat and moisture can loosen the adhesive.
Before using any product, read the label. Check whether it requires ventilation, gloves, or a patch test.

How to Protect the Interior Before Cleaning
The best protection starts before the first spray. Complete these steps in order.
1. Park in a safe, shaded place
Park the vehicle on a level surface in a clean, dry area. Work in shade or inside a garage with the doors open.
Direct sun can make the roof and glass hot. Heat may speed drying, but it can also make cleaner evaporate too fast and leave marks. Good airflow is more useful than intense heat.
Remove loose items from the cabin. Open the doors to improve ventilation.
2. Remove dust without spreading it
Use a vacuum with a soft brush attachment. Gently remove dust from the headliner, pillars, seat tops, and dashboard.
Keep the vacuum head from rubbing hard against the fabric. A hard nozzle can mark the cloth or pull at its edges.
If the headliner has loose fibers, tears, or a sagging section, skip aggressive vacuuming. Clean only the sound areas and consider professional repair.
3. Cover nearby surfaces
Place clean plastic sheeting or a drop cloth over:
- Front and rear seats
- The center console
- The dashboard
- Door panels
- Armrests
- The cargo area, if applicable
Use painter’s tape to hold the covering in place. Do not put tape on delicate leather, soft-touch plastic, wood trim, or freshly treated surfaces. Tape can pull coatings or leave residue.
Keep the windshield and side glass covered if the stain is near the edge of the roof. A towel tucked along the glass can catch drips.
4. Protect lights and controls
Avoid spraying near dome lights, reading lights, sunroof switches, microphones, grab handles, and other roof-mounted controls.
If a light fixture is close to the cleaning area, place a dry towel around it. Do not force liquid under the fixture.
Do not remove trim or disconnect vehicle parts unless you understand the procedure and the vehicle’s service instructions. Side-curtain airbags can be hidden behind roof pillars and trim panels.
5. Test the cleaner
Choose a hidden spot, such as a rear corner near the hatch or a covered edge. Apply a small amount of cleaner to a towel, then dab the test area.
Wait until it dries. Check for:
- Color change
- A hard or shiny patch
- Fabric distortion
- A water ring
- A chemical smell
- Foam separation
If the test area changes, stop. A different product or professional cleaning may be needed.

How to Clean the Headliner Without Damaging It
Use a low-moisture method. The goal is to lift soil from the surface, not soak the material.
1. Apply cleaner to the towel
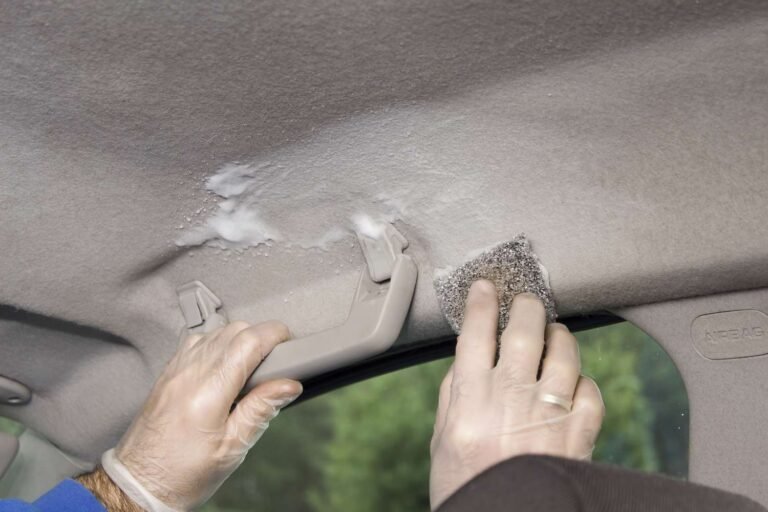
Spray a small amount of cleaner onto a microfiber towel. The towel should be damp, not wet.
Never spray the headliner directly. Direct spraying creates a concentrated wet spot and increases the chance of liquid reaching the backing board, wiring, or roof-mounted parts.
2. Work in small sections
Clean an area about the size of your hand. Start near the edge of the stain and move toward the center.
Use light, straight strokes or gentle dabs. Avoid circular scrubbing. Circular motion can spread a stain and change the fabric’s appearance.
Turn the towel often so you do not move dirt from one section to another.
3. Use a soft brush only when needed
For textured fabric, a soft interior brush may help lift surface soil. Use short, gentle strokes.
Do not push down on the fabric. The headliner material may have only a thin layer of foam behind it.
If the stain does not improve after a few light passes, stop. More pressure and more cleaner may make the damage worse.
4. Blot, do not soak
Use a second dry microfiber towel to blot the area. Press lightly, then lift the towel.
Do not twist, wring, or rub the headliner. Blotting removes moisture while keeping stress on the fabric low.
5. Blend the edges
A cleaned spot may look brighter than the surrounding fabric. To reduce this effect, lightly clean the full nearby panel using the same low-moisture method.
Do not clean only a small circle if the fabric shows a visible border. Use feather-light passes that fade into the surrounding area.
6. Stop when the surface is clean
Do not keep cleaning just because a faint mark remains. Some stains may have soaked into the foam or changed the fabric permanently.
The safest result is a clean, even surface with no loose fabric. A slightly visible old mark is often better than a sagging headliner.
How to Handle Common Headliner Stains
Different stains need different levels of caution. Start with the least aggressive method.
| Stain type | Safer first step | Main risk |
|---|---|---|
| Dust or light dirt | Vacuum and dry microfiber towel | Rubbing soil deeper |
| Fingerprints | Slightly damp towel with mild cleaner | Leaving a water ring |
| Food or drink | Blot first, then use a small amount of fabric cleaner | Sticky residue |
| Grease | Use a product labeled for automotive fabric | Solvent damage |
| Smoke odor | Clean the surface, then ventilate the vehicle | Masking the odor |
| Mold or mildew | Stop and seek professional advice | Spreading spores or moisture |
| Ink or dye | Do not scrub; consult a detailer | Permanent color spread |
| Water stain | Find and repair the leak first | Repeating the stain |
For a fresh spill, blot from the outside toward the center. This limits the spread.
For milk, soda, or other sugary drinks, surface cleaning may not remove the odor. Liquid can travel into the foam backing. Repeated wet cleaning can increase the damage. A professional may need to assess the headliner.
Mold, mildew, or a strong odor after water intrusion needs special care. The source of the moisture must be fixed first. Cleaning the visible area alone may not solve the problem.

How to Dry the Interior Safely
Dry the headliner with airflow, not high heat. Leave the doors open and use a fan outside the vehicle to move air through the cabin.
Do not point a heat gun, hair dryer, or high-temperature blower at the headliner. Heat can soften the adhesive and create bubbles or sagging.
Keep the vehicle ventilated until the fabric feels dry. A damp smell, cool wet patch, dark edge, or soft area means more drying is needed.
Do not close the vehicle for a long period while the headliner is still damp. Trapped moisture can create odor and may affect other interior materials.
If liquid ran into a dome light, switch, microphone, or other electrical part, stop using that component if it acts strangely. Follow the vehicle owner’s manual or ask a qualified automotive technician for help.

Common Mistakes to Avoid
Avoid these habits when cleaning a vehicle headliner:
Spraying the ceiling directly
Direct spray can create a wet spot and send liquid behind the fabric. Spray the towel instead.
Using too much water
More liquid does not always mean better cleaning. It often means longer drying and a higher risk of adhesive failure.
Scrubbing hard
Pressure can flatten the fabric, spread the stain, or expose the foam. Use light passes.
Using household glass cleaner
Glass cleaner may contain ingredients that are not suitable for automotive fabric or foam-backed materials. Use a product made for the surface.
Using a carpet extractor
An extractor may pull too much moisture into the headliner. It can also leave a strong border where the tool stops.
Cleaning in direct sun
A hot surface can dry unevenly and leave marks. Shade and airflow are better.
Ignoring a roof leak
A stained headliner may point to a failed sunroof drain, windshield seal, roof molding, antenna seal, or door seal. Clean the stain only after finding the cause.
Pulling down the headliner
Do not remove the headliner casually. Roof trim may be close to airbags, wiring, and sensors. Use the vehicle service information or hire a qualified technician.
When to Hire a Professional Detailer
Professional help makes sense when the headliner is heavily stained, sagging, torn, moldy, or affected by a large spill.
A detailer should explain the cleaning method before work begins. Ask whether the process uses low moisture and whether the technician will protect roof-mounted electronics and trim.
Professional repair may be better than cleaning when:
- The fabric has separated from the foam.
- The headliner is already sagging.
- A water leak continues.
- The stain covers a large section.
- The vehicle has mold or mildew.
- The spill reached lights or wiring.
- The material changed color after a previous cleaning.
- You are not sure where side-curtain airbags are located.
Cleaning cannot restore adhesive that has already failed. A damaged headliner may need partial repair or replacement.
Signs the Cleaning Worked
A successful cleaning should leave the headliner:
- Even in color
- Free of loose fabric
- Dry to the touch
- Free of a strong chemical smell
- Free of visible wet edges
- Firmly attached to the backing board
Check the area again after it has fully dried. Some water marks appear only after evaporation.
If the fabric begins to bubble, sag, wrinkle, or separate, stop cleaning. Do not press it flat or add more liquid. Further work may enlarge the damaged area.
Frequently Asked Questions
Can I use vinegar to clean a car headliner?
Vinegar is not the best first choice. It may leave an odor, affect some materials, or fail to remove oily soil. Use a mild automotive fabric cleaner and test it on a hidden area first.
Can I use a magic eraser on the headliner?
A magic eraser is abrasive. It may change the texture or color of the fabric. Avoid it unless the vehicle material maker specifically approves it.
Can I use dish soap?
Dish soap can leave residue and may be difficult to rinse from a headliner without adding too much water. An automotive fabric cleaner is usually a better option.
How often should I clean the headliner?
Clean it only when needed. Regular vacuuming with a soft brush can remove dust and reduce the need for wet cleaning.
What should I do if the headliner starts sagging?
Stop immediately. Do not glue or staple the material without checking the vehicle design. The headliner may be near airbags or wiring, and the correct repair may require removal and replacement.
Conclusion
Protecting the interior during headliner cleaning comes down to three rules: cover nearby surfaces, use very little moisture, and avoid heat and pressure. Apply cleaner to a towel, work in small sections, blot gently, and let the cabin dry with good airflow.
If the headliner is sagging, moldy, badly stained, or close to roof-mounted electronics, professional service is the safer choice. A careful low-moisture clean can improve the fabric without turning a small stain into a costly interior repair.